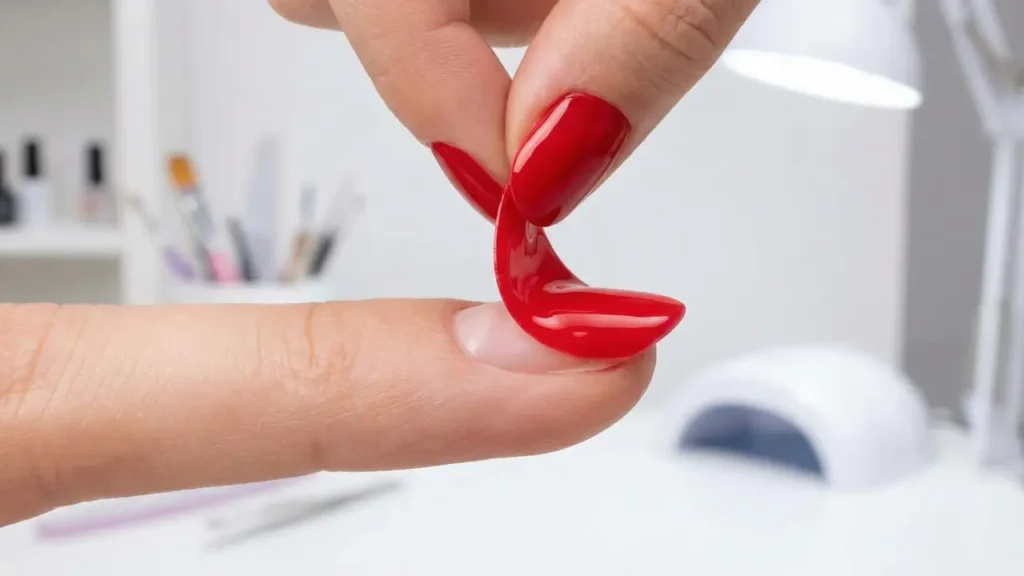
You followed the instructions. You bought the expensive lamp. You spent an hour meticulously painting your nails. And yet, 72 hours later, you are in the shower, running your hands through your hair, and you feel it—the snag.
You look down, and the entire layer of gel has lifted at the cuticle, peeling up like a sticker. It is frustrating, it is a waste of money, and frankly, it makes you want to throw your UV lamp out the window.
But before you blame the brand of polish, we have some hard news: 90% of the time, it is user error.
If your gel polish peels prematurely, it is almost always a chemistry issue. Gel requires a pristine, dehydrated, and textured surface to bond to. If even a microscopic layer of oil or skin is trapped underneath, the bond will fail.
In this troubleshooting guide, we are identifying the “7 Deadly Sins of Prep” that cause lifting, and giving you the bulletproof protocol to make your home manicure last 3+ weeks.
Sin #1: The Invisible Cuticle (The #1 Culprit)
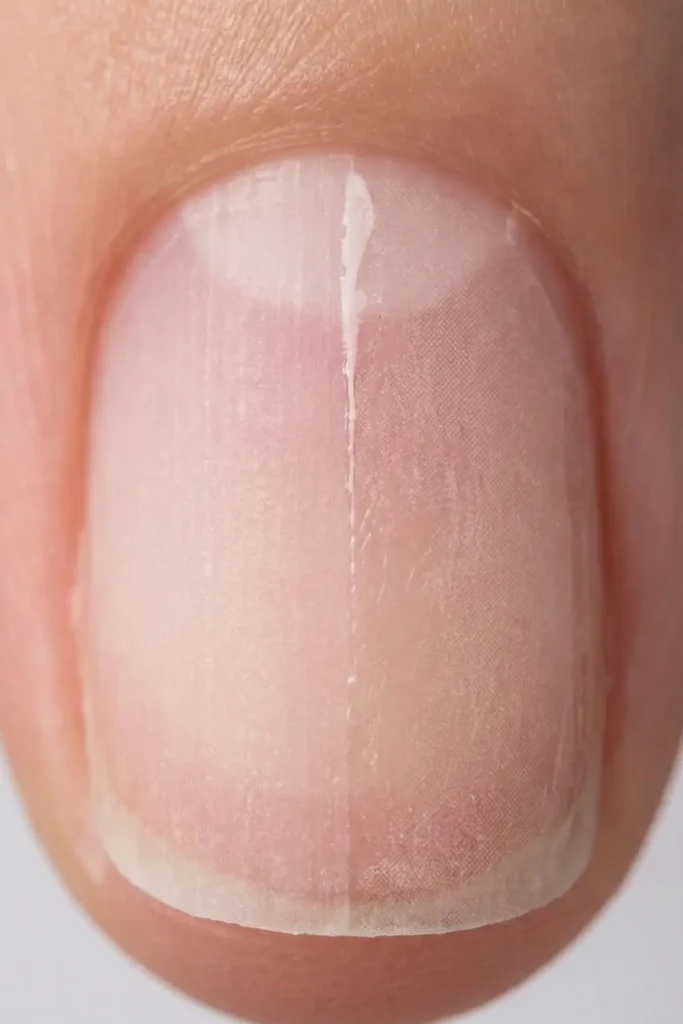
This is the reason for almost all lifting at the base. You might think you pushed your cuticles back, but you likely left behind the “invisible cuticle” (the thin, transparent layer of dead skin attached to the nail plate).
The Science: Gel sticks to keratin (nail). It does not stick to skin. If you paint over even a millimeter of that invisible skin, the gel will lift as soon as your skin produces oil. The oil gets under the gel, breaks the seal, and pop—it peels.
The Fix: You need to scrape, not just push. Use a glass cuticle pusher or a cuticle remover liquid to dissolve that dead skin layer completely. (Read our deep dive on this in Cuticle Care 101 to master the technique).
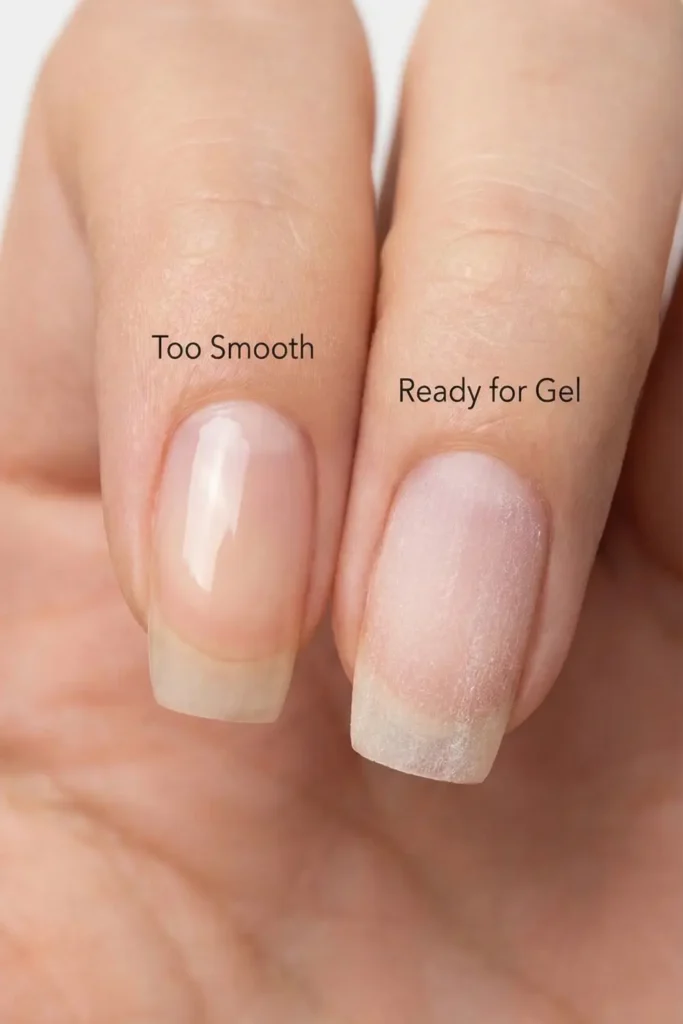
Sin #2: The “Smooth Surface” Mistake
If your natural nails are shiny and smooth like glass, your gel has nothing to hold onto.
The Science: Gel needs “mechanical adhesion.” Ideally, your nail surface should look like the rough side of Velcro under a microscope. It needs tiny scratches and ridges to grip. If you buff your nails to a shine before painting, the gel will slide right off.
The Fix: Stop using smooth buffers. Use a 180-grit file to gently remove the shine from your natural nail. You don’t want to thin the nail, you just want to make it look chalky and matte.
Stylist Tip: Do not touch your face or hair after buffing. The oils from your skin will transfer back to the nail instantly.
Sin #3: Skipping the Dehydrator
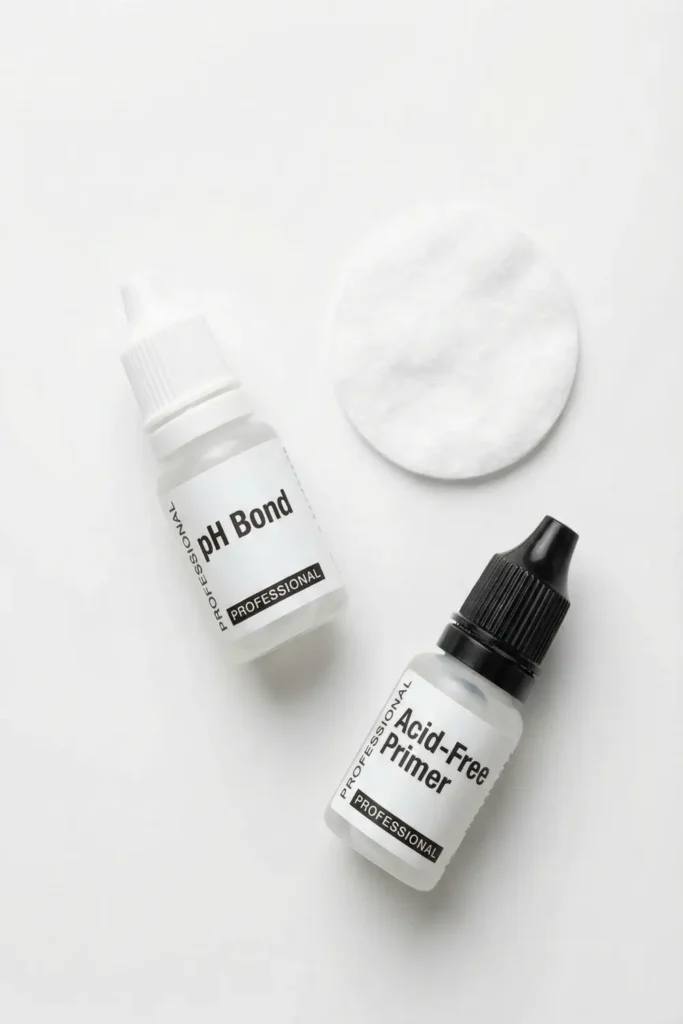
Water and oil are the enemies of gel. If your nail plate has moisture in it when you cure the gel, that moisture will try to escape later, pushing the polish off.
The Science: Our nails are porous sponges. If you wash your hands right before your manicure, your nails absorb water and expand. As they dry over the next few hours, they shrink back to normal size. The gel (which is hard plastic) does not shrink. This mismatch causes the bond to snap.
The Fix:
- The “No Water” Rule: Do not wash your hands or shower for at least 1 hour before doing your nails.
- Chemical Dehydration: Use a specific “Nail Dehydrator” (pH Bond) followed by a “Nail Primer.” The dehydrator strips the oil; the primer acts like double-sided sticky tape.
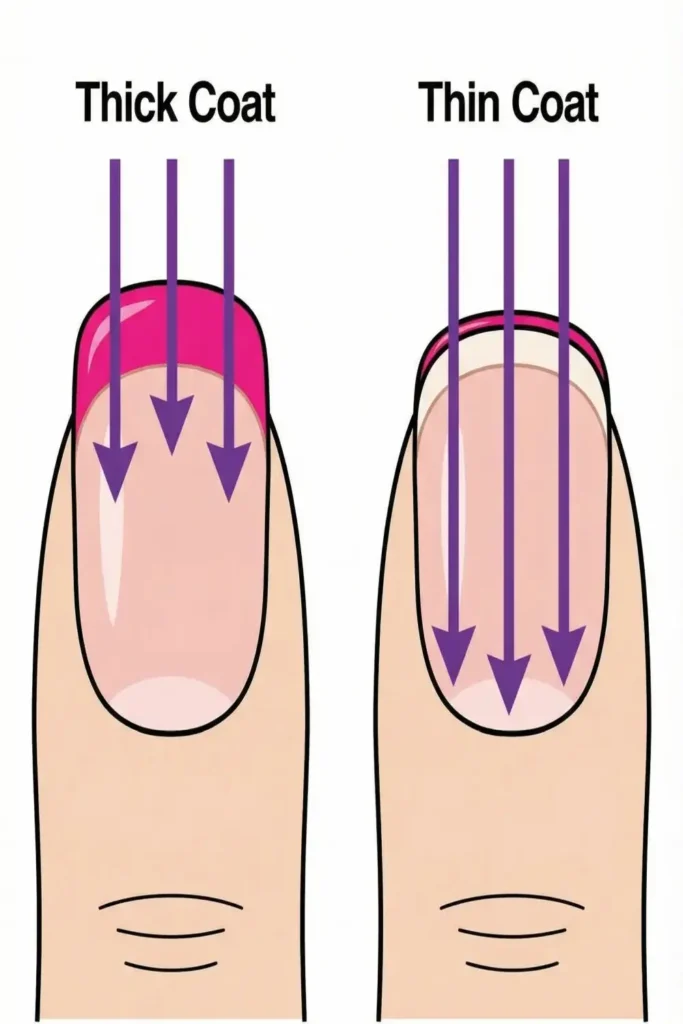
Sin #4: Painting Too Thick
We get it—you want full coverage in one coat. But thick layers are a disaster for gel chemistry.
The Science: UV light can only penetrate so deep. If your layer of polish is thick and gloopy, the light might cure the top, but the bottom (touching your nail) stays raw and uncured. This uncured goo causes the hard top layer to slide around and eventually peel off in one sheet.
The Fix: Apply your gel in layers that are practically see-through. The first coat should look streaky. It is better to do 4 paper-thin coats than 2 thick ones.
Sin #5: Flooding the Sidewalls
If your polish touches the skin on the sides of your finger, your manicure is doomed before you even put it in the lamp.
The Science: When gel touches the skin, it creates a “bridge” between the nail and the flesh. As your skin moves naturally, it pulls on that bridge, lifting the gel away from the nail plate. Once that seal is broken, water gets in, and the peeling begins.
The Fix: Leave a “safety gap.” There should be a hair-width gap between your polish and your cuticle line. It looks cleaner and prevents lifting. If you flood the cuticle, clean it up with an angled brush dipped in acetone before you cure.
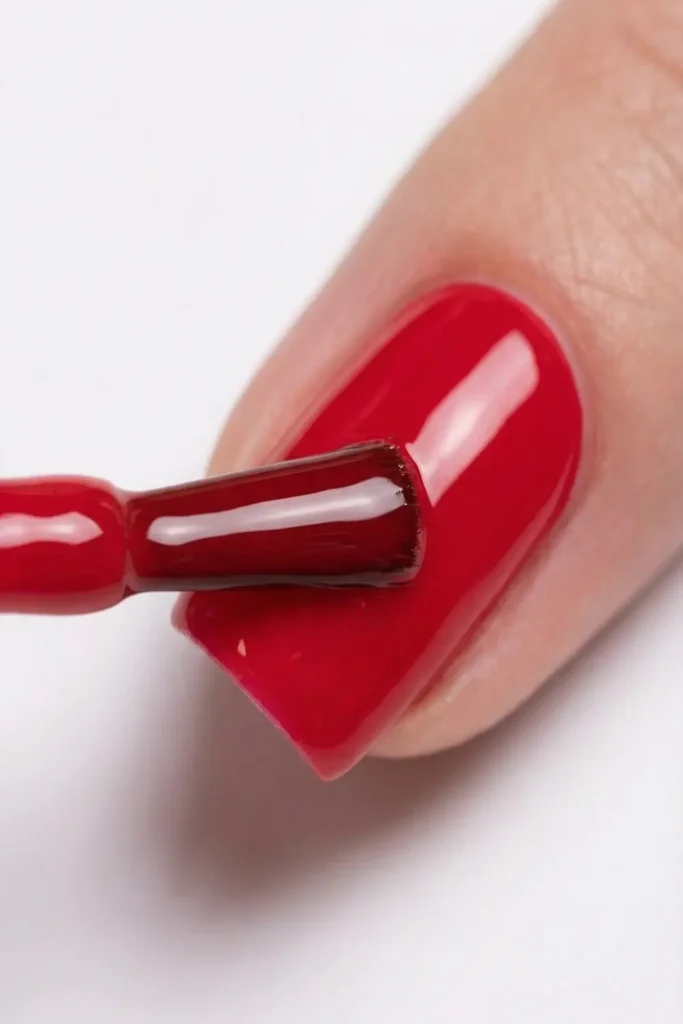
Sin #6: Forgetting to “Cap the Free Edge”
If your gel polish peels from the tip rather than the cuticle, this is your problem.
The Science: We use our hands for everything—typing, opening cans, scratching. This wears down the tip of the polish. If the edge is raw, the gel will start to chip back.
The Fix: “Capping” means running the brush horizontally along the very tip of your nail to seal the edge. This wraps the color around the nail, protecting the vulnerable free edge from friction.
Stylist Tip: Cap the free edge with every layer: base, color, and top coat.
Sin #7: Your Lamp is Weak
You can do everything right, but if your lamp is old or low-wattage, your gel will never cure properly.
The Science: UV bulbs degrade over time. After about 6-9 months of heavy use, they lose power. They might still light up blue, but they aren’t emitting enough UV wavelengths to harden the polymers. Also, many mini “travel lamps” are only 6 watts, which is not strong enough for most modern gel brands.
The Fix:
- Use a lamp with at least 48 Watts.
- If your lamp is over a year old, replace it.
- Make sure your hand placement is correct. Thumbs often peel because they are positioned sideways in the lamp and don’t get direct light. Cure thumbs separately!
The “Bulletproof” Application Routine
Print this out and follow it next time you paint.
- Dry Prep: Push cuticles and scrape off invisible skin (dry, no water).
- Etch: Buff the nail surface with a 180-grit file until matte.
- Cleanse: Wipe with 90% Isopropyl Alcohol or pure Acetone to remove dust.
- Dehydrate: Apply pH Bond.
- Prime: Apply Acid-Free Primer (sparingly).
- Base Coat: Apply a thin layer, scrubbing it into the nail plate. Cure.
- Color: 2-3 thin layers. Cure between each.
- Top Coat: Apply, cap the free edge, and cure for 60 seconds.
- Finish: Wait 60 seconds for the nails to “cool down” before applying cuticle oil.
FAQ: Troubleshooting the Peel
1. Can I just glue the peeled part back down? No. If you put nail glue under lifted gel, you are trapping bacteria and moisture in a dark, warm space. This is the perfect recipe for a “Greenie” (bacterial infection) or mold. If it lifts, you must soak it off and redo it.
2. Why does my gel feel sticky after curing? That is normal! It is called the “inhibition layer.” It is a sticky residue that helps the next layer adhere. Do not wipe it off until the very end (unless you use a No-Wipe Top Coat).
3. Does the brand matter? Yes and no. Cheap gels often have more solvents and less pigment, leading to poor curing. However, expensive gel will still peel if your prep is bad. Master the prep first, then upgrade your polish.
Conclusion
If your gel polish peels after 3 days, it isn’t bad luck—it’s bad prep. The secret to a 3-week manicure isn’t in the painting; it’s in what you do before you even open the bottle.
Treat the preparation phase as the main event. Be meticulous about removing oil, be aggressive with the “invisible cuticle,” and paint like you are running out of polish (thin is in!).
Once you master the chemistry of adhesion, you won’t just save money on salon visits; you’ll have nails that can withstand life, work, and everything in between.
For more expert tips on maintaining a salon-quality manicure at home, check out InStyle’s Guide to Long-Lasting Manicures.