
We have all been there. It is 10 PM on a Tuesday and you want to safely remove gel nails without going to the salon. The temptation to peel them off is overwhelming. It starts as a mindless habit while watching TV, picking at that one loose corner, and before you know it, you have ripped the entire polish off.
Resist the urge. Peeling off your gel polish is arguably the single worst thing you can do to your nails. When you rip that polish off, you aren’t just removing the color; you are tearing off the top layers of your natural nail plate (the dorsal layer). This leaves your nails paper-thin, sensitive to hot water, and prone to painful splitting.
The good news? You do not need a salon appointment to take them off safely. With a few drugstore supplies and about 30 minutes of patience, you can remove your gel manicure without damaging a single cell of your natural nail bed.
In this comprehensive guide, we are walking you through the professional “Soak-Off” method used by top nail techs. We will also debunk dangerous viral hacks, explain the chemistry behind removal, and give you a 7-day rehab plan for your tips. Put down the scraper, grab your acetone, and let’s save your nails.
The Science: Why You Should Never “Pop” or Peel
Before we get to the “how,” let’s briefly touch on the “why” to ensure you never pick again. Your nail plate is made of layers of dead keratin cells, stacked like roof shingles. Gel polish is formulated to bond incredibly tightly to these shingles using photo-initiators that harden under UV light.
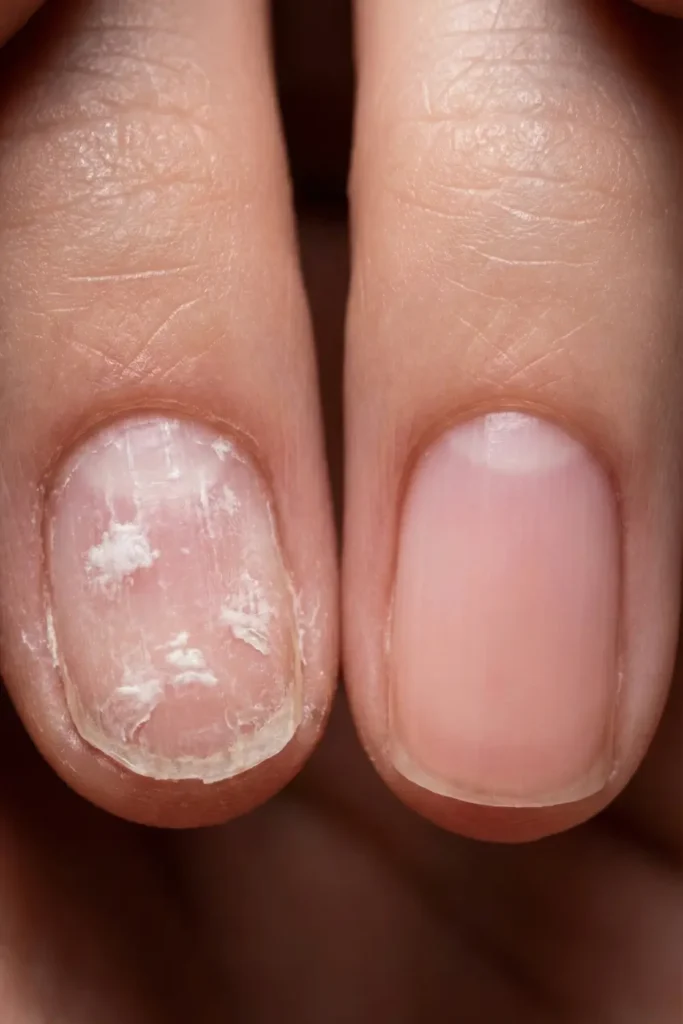
When you force the gel off without dissolving the chemical bond first, you pull the shingles up with it. Under a microscope, a peeled nail looks like a ravaged landscape—pitted, rough, and thinned out. This damage results in “onychoschizia” (splitting) and those tell-tale white rough patches that take 4-6 months to grow out fully.
Stylist Tip: If you have already peeled them and your nails hurt, stop everything. Cut them short to prevent snagging, apply cuticle oil, and do not put any polish on them for at least 2 weeks.
Step-by-Step Guide to Safely Remove Gel Nails
You do not need a fancy drill (in fact, we advise against using e-files at home unless you are professionally trained). The manual method is slower but much safer for beginners. Here is the definitive checklist:
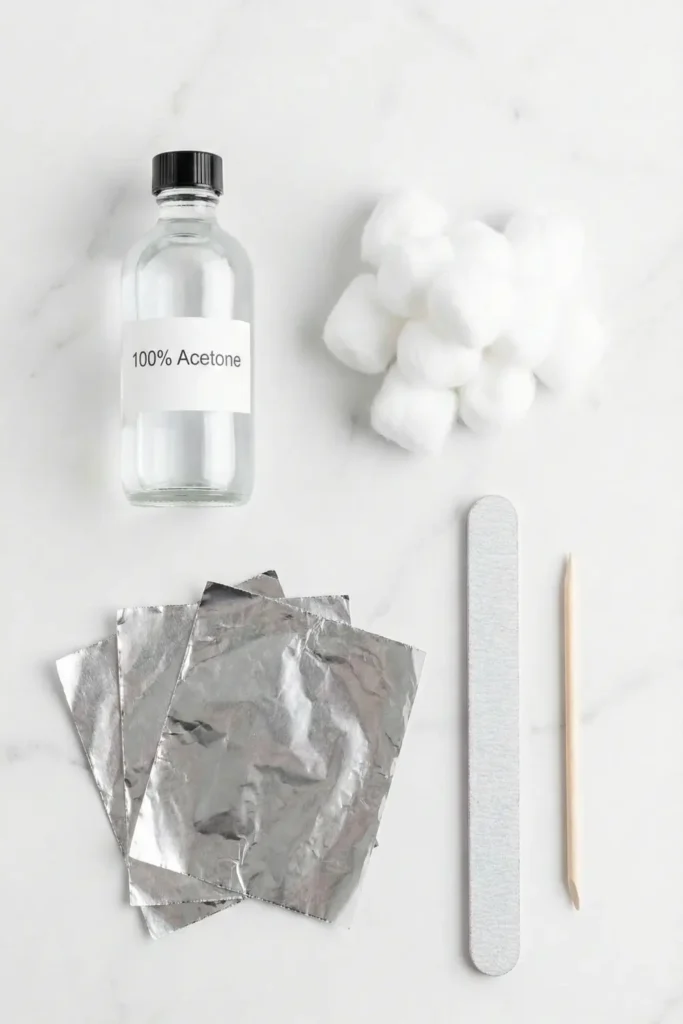
- 100/180 Grit Nail File: You need a file with two textures. The coarse side (100 grit) is to break the top coat. The medium side (180 grit) is for shaping.
- 100% Pure Acetone: “Nail Polish Remover” won’t cut it. Standard removers are diluted with water and moisturizers. It must say “100% Acetone” on the bottle to dissolve the polymers effectively.
- Cotton Balls: Or cotton pads cut into quarters. Cotton balls hold more liquid, which is better for soaking.
- Aluminum Foil: Cut into 10 squares (approx 3×3 inches). Thicker “heavy duty” foil works best as it doesn’t tear.
- A Wood Stick (Orange Stick): Metal pushers can be too harsh for softened nails and can accidentally gouge the nail plate. Wood is softer and safer.
- Buffing Block: To smooth the final surface.
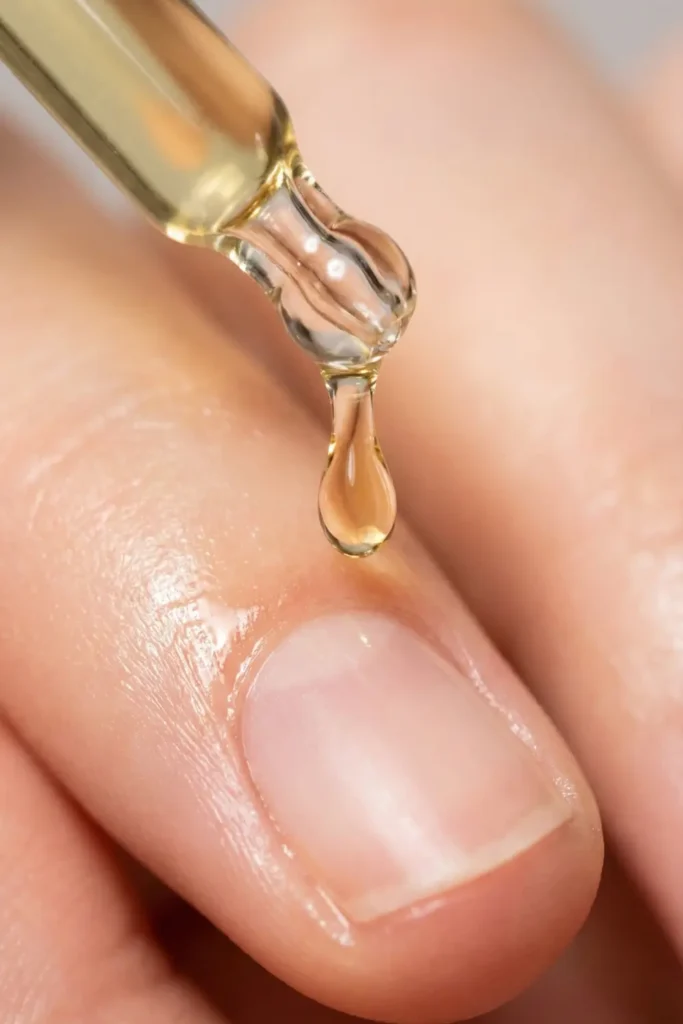
- High-Quality Cuticle Oil: The most important step (Jojoba based is best).
Step-by-Step Removal Guide
Follow this process exactly. Do not rush the soaking time. This is a chemical reaction, and it cannot be hurried.
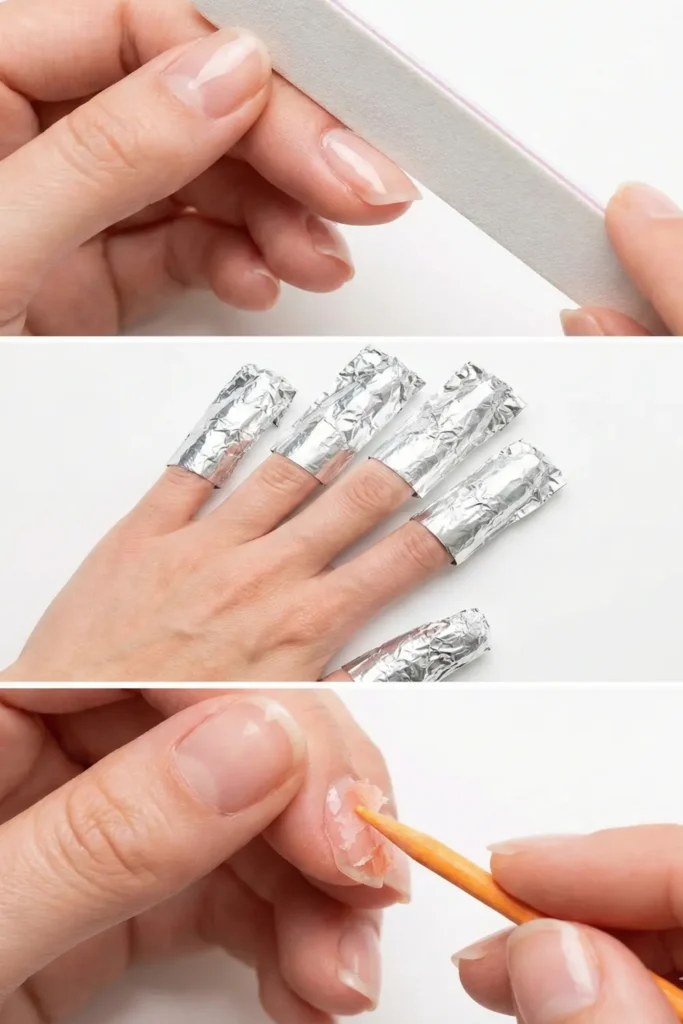
Step 1: Break the Seal (The Filing)
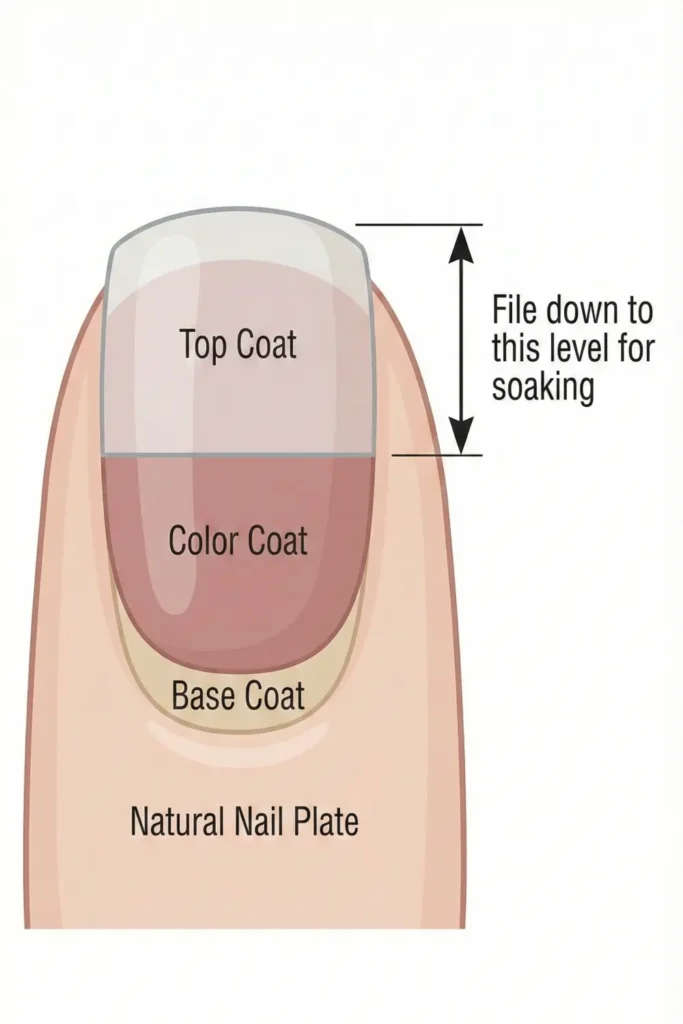
Take the coarse side (100 grit) of your file and sand down the shiny top layer of your gel. You want the color to look matte and scratched up.
- Why: Gel top coats are designed to be non-porous and impenetrable. Acetone cannot penetrate a shiny surface. You have to “open” the surface so the liquid can get inside.
- Caution: Don’t file down to your natural nail. Just remove the shine and perhaps the first layer of color. If you see dust that matches your nail color, stop—you’ve gone too deep.
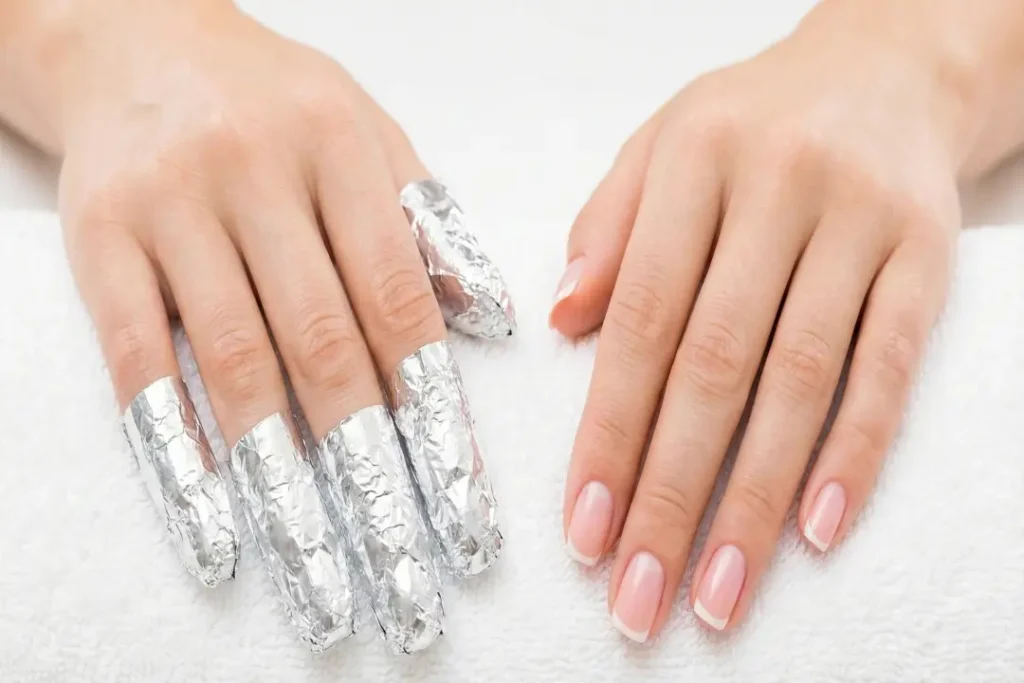
Step 2: The Wrap
Soak a piece of cotton in the acetone until it is dripping wet. Place it directly on top of your nail. Wrap the aluminum foil tightly around your fingertip to seal it in.
- The Technique: Fold the top of the foil over the fingertip first, then wrap the sides. Squeeze it tight. The goal is to prevent air from getting in, which evaporates the acetone.
- Stylist Tip: Body heat speeds up the reaction. Wrap your hands in a warm towel or put on a pair of latex gloves over the foil packets to trap the heat. This “greenhouse effect” can cut your soaking time in half.
Step 3: The Wait
This is the hardest part. Wait 15 to 20 minutes. Do not peek. If you open the foil every 5 minutes to check, the acetone evaporates and stops working. Put on a Netflix show and sit on your hands. If you are removing a glitter gel or a very dark color, aim for 25 minutes.
Step 4: The Push
Remove one foil wrap (start with the finger you wrapped first). The gel should look flaking and lifting, like peeling paint. Take your wooden stick and gently push the gel off the nail, moving from cuticle to free edge.
- Crucial Rule: If you have to scrape hard, it is not ready. Do not force it. Wrap it back up and soak for another 5 minutes. The gel should crumble off like butter.
Step 5: The Buff & Hydrate
Once the bulk of the color is gone, your nails might look a little scaly or have tiny specks of base coat left. Use a soft buffer block to gently smooth the surface. Wash your hands thoroughly to remove the acetone residue, then drown your nails in cuticle oil.
Debunking Viral Hacks: What NOT To Do
TikTok is full of “hacks” to remove nails faster. Most of them are dangerous. Here is why you should avoid them.
1. The “Dental Floss” Method This hack involves sliding a piece of dental floss under the gel to “saw” it off.
- Why it’s bad: This is essentially the same as peeling. You are mechanically ripping the bond between the gel and your nail plate. It will take layers of your natural nail with it.
2. The “Hot Water” Method Some people suggest soaking your hands in hot water and dish soap to lift the gel.
- Why it’s bad: Hot water works on standard polish, but cured gel is a plastic polymer. Water won’t dissolve it. However, soaking your hands in hot water for 30 minutes will cause your natural nail to absorb water and swell. If you try to peel the gel off a swollen nail, the damage is catastrophic.
3. “Popping” Them Off Using a credit card or a metal tool to pry the gel off the side.
- Why it’s bad: This exerts massive pressure on the nail matrix (the root). Not only does it damage the surface, but repeated trauma can cause the nail to grow back with permanent ridges.
Handling “Stubborn” Gels (Glitter & BIAB)
Not all gels are created equal. Some require a different approach.
Glitter Gel: Glitter is notoriously difficult to remove because the glitter particles lock together like cement.
- The Fix: File more aggressively in Step 1. You need to really break up the glitter surface. Use twice as much acetone on the cotton ball.
BIAB (Builder In A Bottle): BIAB is thicker and stronger than regular gel polish.
- The Fix: Most BIAB is designed to be “infilled,” not removed every time. However, if you must remove it, you will need to debulk the product significantly with your file before soaking. You want to file away about 80% of the product thickness, leaving just a thin layer to soak off. (Check out our guide to BIAB vs. Gel-X to understand more about Builder Gel structure).
Hard Gel: If your gel is not bubbling or lifting after 20 minutes of acetone, you might be wearing “Hard Gel.”
- The Fix: Hard Gel is non-porous and cannot be soaked off. It must be filed off completely. If you have this on your nails, do not continue soaking. Go to a professional to have it safely e-filed off.
Aftercare: The 7-Day Nail Rehab Plan
Acetone is effective, but it is also incredibly drying. It strips the natural oils from your skin and nail plate, leaving them white and chalky. The week after removal is critical for restoring moisture and flexibility.
Day 1 (Removal Day): The “Slugging” Method. Before bed, apply a thick layer of cuticle oil, followed by a heavy hand cream, and then lock it all in with a thin layer of Vaseline or Aquaphor. This occlusion forces moisture back into the keratin.
Day 2: Keep them short. Without the hard coating of gel, your nails are flexible and prone to breaking. File them down to a short, active length to prevent snagging.
Day 3: Hydration Focus. Apply cuticle oil at least 3 times today. If you work at a desk, keep a bottle next to your keyboard.
Day 4: Strengthener (Optional). If your nails feel bendy, apply a clear nail strengthener. Look for ingredients like hydrolyzed wheat protein or calcium. Avoid “hardeners” with Formaldehyde, as they can make nails brittle and more likely to snap.
Day 5: Massage. Massaging your cuticles stimulates blood flow to the matrix, which promotes healthy growth.
Day 6-7: Assess. If your nails look pink and smooth, you are ready for your next manicure. If they still look peeling or white, wait another week.
FAQ: Troubleshooting Your Removal
1. Why are my nails white after taking off gel? That white chalky residue is usually dehydration (dried-out keratin cells). A quick buff and some oil will usually make it disappear. However, if the white spots are rough and pitted, that is damage from peeling or over-filing.
2. Can I use a drill (e-file)? Only if you are trained. It is very easy to drill too deep and create “rings of fire” (painful red indentations) in your natural nail plate. For home removal, a hand file is always safer because you can feel the pressure and texture change as you get closer to the natural nail.
3. Does acetone expire? Technically no, but it evaporates very quickly. If you have an old bottle that has been sitting with the cap loose, it might have lost its potency. Always cap your acetone tightly.
Conclusion
Removing gel nails at home doesn’t have to be a disaster. It is a ritual of patience. By treating your removal process with the same care and precision as your application process, you ensure that your canvas stays healthy for your next design.
Your natural nails are jewels, not tools. Treat them kindly, and they will grow longer and stronger than ever before.
For more medical advice on keeping your nails healthy during gel use, we recommend reading the American Academy of Dermatology’s Tips for Gel Nail Safety.
